Posts

Information Preservation - Painting the Refit (ST:TMP) - By Andy "Gunstar1" Grams on Hobby Talk

Image
Hi, Everyone! Here is another blog article that I put together in order to preserve modeling information originally posted on other sources. While doing some casual Enterprise refit painting research, I came across a very insightful forum thread on Hobby Talk that was started on June 22, 2007 by forum member Andy "Gunstar1" Grams.  It was entitled "Painting the Refit ( ST:TMP )."  Here is the link: https://www.hobbytalk.com/threads/painting-the-refit-st-tmp.188494/ . Andy started that particular thread with knowledge gained from personal conversations he had with Paul Olsen, the one who performed most of the paint work on the Enterprise refit filming miniature.  The Hobby Talk forum discussion ended up being 12 pages long with Andy's last significant contribution to it on May 20, 2009.  Andy is still seen on Hobby Talk nowadays but has not been a significant contributor to any forum discussions there since 2010. Because of Andy's unique position of having di...

Information Preservation - Enterprise Refit Aztec Painting - By Tony "Raist3001" of Enterprise Creations

Image
Hi, Everyone! While doing some casual Enterprise refit painting research, I came across a very insightful 12-page forum thread on Hobby Talk that was started on June 22, 2007 by forum member "Gunstar1."  It was entitled "Painting the Refit ( ST:TMP )."  Here is the link: https://www.hobbytalk.com/threads/painting-the-refit-st-tmp.188494/ . On November 18, 2007, forum member Tony "Raist3001" began posting links of his painting experiments and findings on his now-defunct website, Enterprise Creations.  He wrote up three pages of information which are quite informative.  Unfortunately, he stopped contributing to the Hobby Talk thread on November 9, 2009, and he has not been on Hobby Talk since August 12, 2014. It would have been a shame if his findings were lost, but through the magic of the Internet Archive Wayback Machine his Enterprise Creations posts were found!  I wanted to create a blog article to preserve Tony's write-up, so here it is... ===== Azt...

Alan Grant's Velociraptor Killing Claw

Image
Hi, Everyone! My wife loves the Jurassic Park franchise, so I thought I would make her a velociraptor killing claw, much like the one Alan Grant had in the first Jurassic Park movie.      First, I downloaded a claw STL file for 3D printing from the Thingiverse repository site ( https://www.thingiverse.com/thing:3585364 ).  I used Overture black PLA filament and printed using my Artillery Sidewinder X1.  The print came out very nicely, but had the typically visible layer lines so I used Liquitex Modeling Paste to hide those lines and to provide a texture similar to fossilized bone. When I was satisfied with the sanded finish, I laid down multiple coats of grey primer.  After that, I airbrushed thinned down black craft acrylic paint.  Once dried, I went over the model with Krylon UV-resistant clear matte acrylic coating spray.  Finally, I gave the textured areas some subtle weathering using earth tone chalk pastels. Check out the pictures below. I...

Hand-held USB-rechargeable Air Compressor / Airbrush Set

Image
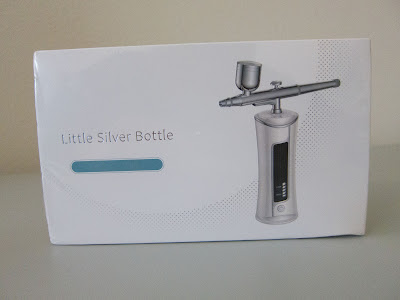
 Hi, Everyone! I've been eyeing some hand-held, USB-rechargeable, air compressor / airbrush sets for a couple of years now and finally decided to get one to try out.  These devices have found uses in barber shops / beauty salons, spas, food preparation, crafting, scale modeling, and many other hobbies.  They are handy because they are portable and relatively quiet. Early models featured rechargeable batteries that had capacities ranging from 700 to 950 mA.  This allowed the compressor to run for about 20 to 30 minutes.  More current models have higher-capacity batteries, allowing the compressor to get 45 minutes to an hour of usability. The one I picked up has the following specifications... Compressor: 1200 mA rechargeable battery USB-C interface Input voltage of 5 volts at 2A Remaining charge indicator Low PSI (about 15 to 20 PSI) and High PSI (about 25 to 30 PSI) settings Over heat detection with automatic shut off  Airbrush: Gravity feed, dual action ai...

How To Correctly Mark The Lower Primary Hull Concentric Rings On The AMT 1:650 TOS Enterprise Model Kit

Image
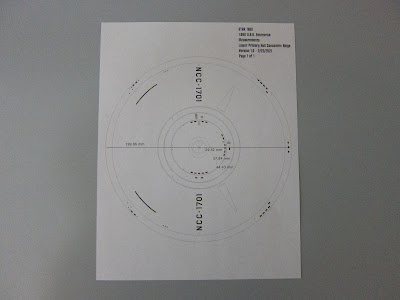
Hi, Everyone! The AMT / ERTL / Round 2 1:650 TOS U.S.S. Enterprise model is widely regarded as a classic kit.  However, that has never meant that it is a perfect kit.  Far from it, actually.  When the model was tooled in 1966, it had plenty of accuracy issues.  Then when many of the parts were re-tooled in the early 1970s, even more problems were introduced. One of the trouble spots that has never been addressed are the three concentric rings on the lower primary hull part.  From the start, AMT had it wrong.  The tooling created three raised rings which were not correctly sized or spaced.  Modelers who wish to try accurizing that area usually start by sanding away those rings.  But what are the measurements for a new set of rings? First, find yourself a detailed image of the lower primary hull that you trust is accurate.  Personally, I went with a vector-based image that was used for the Polar Lights 1:1000 TOS Enterprise model kit.  T...

Roof Panel Lines Decal / Mask For The Polar Lights 1:32 TOS Galileo Shuttlecraft Model Kit

Image
Hi, Everyone! I started a project to make a decal / mask for the Polar Lights / Round 2 1:32 TOS Galileo shuttlecraft model kit. As per Star Trek historian and filming miniature information archivist extraordinaire Gary Kerr ( https://modelermagic.com/gary-kerrs-12-studio-scale-11-star-trek-shuttlecraft-for-the-polar-lights-kit/ )... The coolest feature was discovered almost too late.  Doug Drexler and aerospace historian and writer, Glen Swanson, have been sleuthing through various archives in Los Angeles, and we've all been chipping in to get 600 dpi scans made.  They discovered several hi-res photographs of the newly-built 22-incher, and I saw something completely unexpected on the miniature's roof: scribed panels that were very similar to the panels that Thomas Kellogg had drawn on his concept illustration during the 1966 design process.  This discovery came late in the pre-production process, after a smooth roof had already been tooled, but Polar Lights will supply...

Comparing The AMT 1:650 TOS Enterprise Deflector Dish Assemblies With A 3D Printed Version

Image
Hi, Everyone! I started a project to make a more accurate deflector dish assembly for the AMT / ERTL / Round 2 1:650 TOS U.S.S. Enterprise model kit. Back in the early 1970s, AMT changed the tooling of their 1:650 U.S.S. Enterprise model.  Although the kit itself from its original 1966 tooling had its accuracy problems, the changes made in the early 1970s created even more issues.  One of the issues was the deflector dish assembly: The housing was changed / simplified where the outside wall was raised higher, the inner three stepped rings were all made the same height as the outside wall, and the three "extrusions" from the secondary hull were added. The dish assembly was changed from an overly large dish with an equally overly long stem to a detail-less pie pan looking dish with a shortened stem.   When the Smithsonian put together the team for the 2016 TOS Enterprise 11-foot filming miniature restoration project, Gary Kerr - Star Trek historian and filming miniature ...